®
®
Faximum ELS/PLUS Reference Manual
for SCO OpenServer 5 - Release 2.1 - HTML Edition - Draft 1
[Top] [Prev] [Next] [Bottom]
The Transmit Menu
This chapter describes the Faximum Transmit menu. As shown in Figure 26, this menu includes four items:
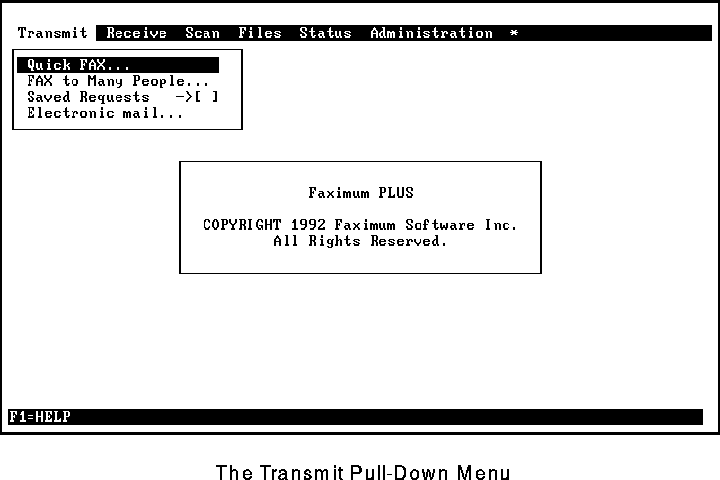
Quick FAX
This permits the user to send a fax to a single destination.
Fax to Many People
This allows a fax to be broadcast to many people.
Saved Requests
This enables the user to edit or send a previously saved request.
Electronic Mail
This invokes the standard UNIX electronic mail system, enabling the user to send an E-mail message.
The following sections describe these menu selections in more detail.
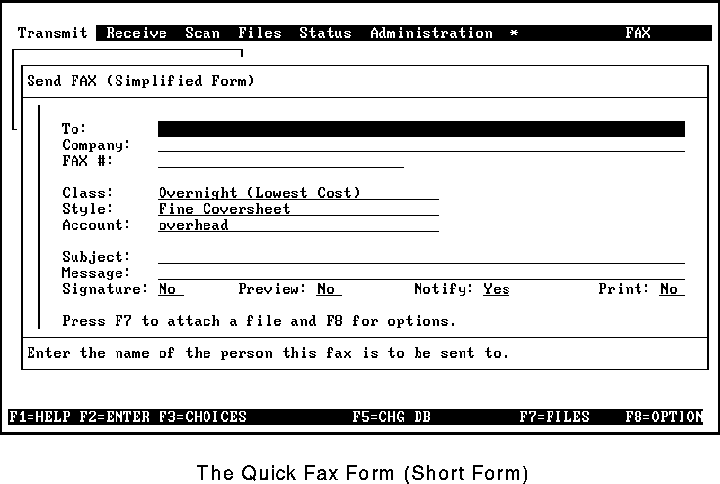
 The available function keys are displayed at the bottom of each form. For example, in Figure 27, F1 summons help, F2 marks the form as complete, F3 lists choices for the current field, F5 allows you to switch databases, F7 allows you to add a list of attachments (files) to the fax, and F8 displays the long form for Quick FAX. Available functions keys may change as the current field changes.
Quick FAX
The Quick FAX selection permits the user to specify quickly all of the information necessary to generate a fax to be sent to a single destination.
Starting a Fax
When the Quick Fax option is selected, one of two forms (Figure 27 or Figure 28) is displayed. The short form (Figure 27) is somewhat easier to use while the long form (Figure 28) presents all of the information on one screen. The format to be used is based on the setting of the Expert parameter in the Preferences form. (See "Preferences" on page 91.) By default you will see the short form.
If you are viewing the short form, you can switch to the long form by pressing F8.
Although you can manually complete all of the fields in either form, there is a much faster way. If the cursor is in a field that the computer can help fill in, the bottom status line will show F3=CHOICES. Pressing F3 will display a list of choices. For example, if you press F3 when the To: field is selected, a list of all of the people in the current people database is displayed (Figure 29).
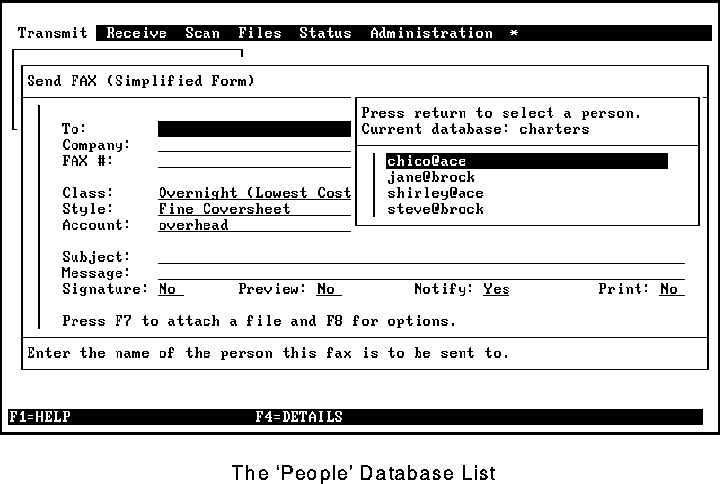
You can highlight an entry by using the up and down cursor keys, or by typing in a name. As you type in more letters, Faximum will select the first name that starts with the letters you have typed so far. The cursor will also move to indicate the last character matched so far. If no match can be found, Faximum will beep. To start searching for another name, press either the up or down cursor key and start typing a new name.
Names are case-sensitive. This means that the list will be sorted so that capital letters appear before lower case letters. It also means that when you are typing in a name to match, the case must match as well as the letters themselves.
When a list of choices is displayed, you may press F4 to obtain further information on the currently highlighted entry (see Figure 30)
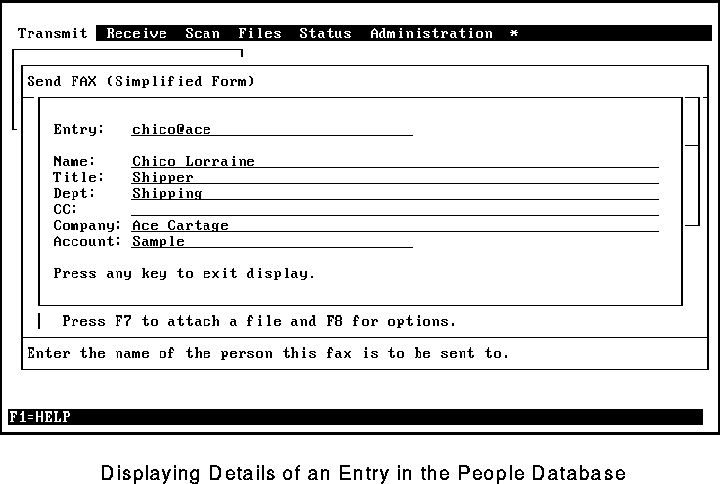
.
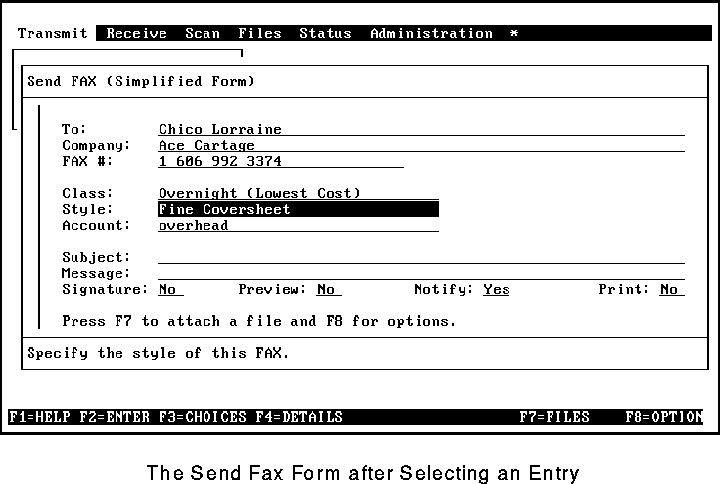
If you press Return when an entry is highlighted, Faximum takes the information from the record and uses it to fill in the form (see Figure 31).
Choices are available for the Company, Class, Account, Style, and Message fields.
We shall now examine each field in turn and describe the types of values that may be entered:
To:
This field contains the full name of the person who is to receive the fax. The information in this field will be placed on the cover sheet (if one is to be generated) and in the accounting record.
Company:
This field contains the name of the company that is to receive the fax. The information in this field will be placed on the cover sheet (if one is to be generated) and in the accounting record.
FAX #:
This field must contain the phone number of the fax machine that this fax is to be sent to. If your system is configured for intelligent dialling, then the prompt at the bottom of the form will read "Enter the primary FAX number. (Country code, Area code, Exchange, Number)". This means that the number (even if local) must have these four parts separated by spaces or punctuation. Faximum will strip off the country code and area code or add the appropriate dialling prefix as necessary. For example, even if you were in San Francisco, you would enter a San Francisco fax number as 1 415 555 1212 (1 (415) 555-1212 and 1.415.555.1212 are also acceptable). If the country you are dialling does not have area codes then you must split the exchange and number components to create a fourth component.
If your system is not configured for intelligent dialling, then the prompt will read Enter the primary FAX number. (Exactly as it is to be dialled.). In this case you enter the number exactly as it would be dialled (including any dialling prefixes such as 9).
For more information see "Intelligent Dialling" on page 101.
Class:
This field specifies the class of service that this transmission is to use. The class of service specifies various scheduling parameters such as priority, maximum number of retry attempts, etc. Pressing F3 while in this field will display a list of choices. See "The Class of Service Database" on page 28.
Style:
This field specifies the style that this transmission is to use. The style specifies various parameters that affect the appearance of the fax such as the coversheet design (even whether or not there is a cover sheet), the resolution, the page length, and the letterhead overlay to use on the first attachment, etc. Pressing F3 while in this field will display a list of choices. See "The Style Database" on page 37.
Account:
This field specifies the account to which this transmission is to be charged. If accounting has been turned off (see "Configuration" on page 100) then this field will not appear. If only previously entered accounts are to be used, then pressing F3 will display a list of choices. Otherwise anything can be typed in here (i.e. client or project number, file number, etc.) and it will be placed in the accounting log. See "The Account Database" on page 27.
Subject:
The Subject field is used for a one-line description of the fax on the cover sheet.
Message:
The Message field supplies the message that will appear on the cover sheet. This field may be the name of a file containing the message (a standard ASCII file) or the message itself.
While in the Message field, you can press F5 to invoke the standard editor (as defined by your environment variable EDITOR) to edit the file specified in the Message field. If the Message field is blank when F5 is pressed, Faximum will automatically generate a unique file name based on the name of the company to which you are sending the fax.
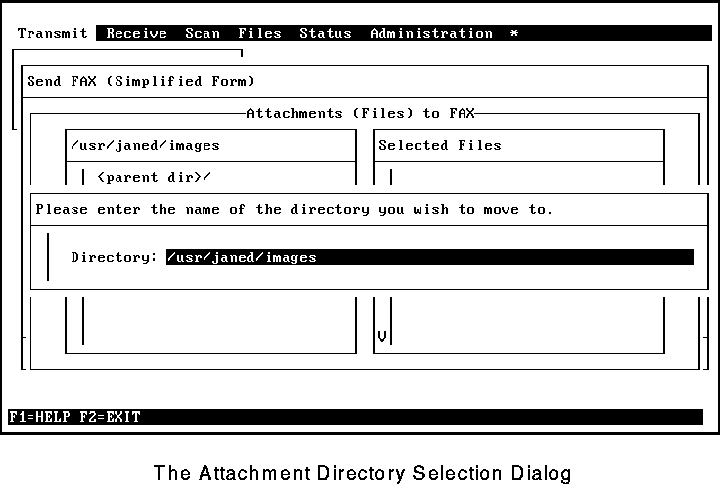
If you press F3 (choices) while in the Message field, the resulting display (Figure 32) is somewhat different from the other menus that you have seen.
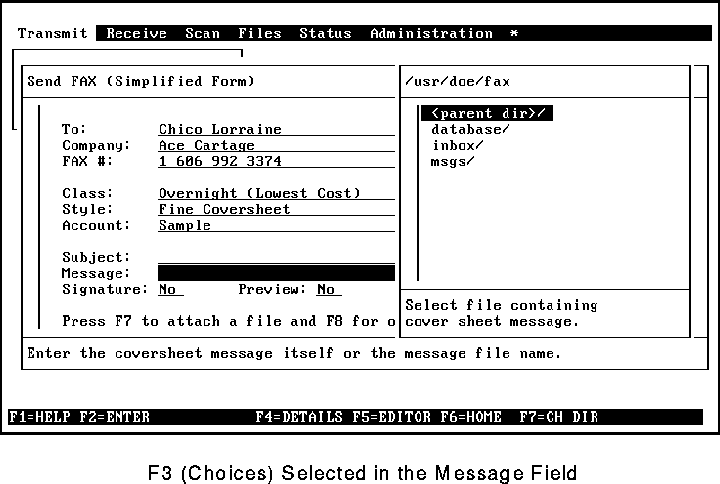
This screen is Faximum's standard file-selection screen. Whenever you are asked for the name of a file or directory, you are presented with this display.
At the top of the window is the name of the current directory. The body of the window consists of the files and directories in the current directory. (Directories can be distinguished from files by their trailing `/' character.)
To select a file or directory, use the cursor keys to highlight the name. If you wish to view the contents of a directory, highlight the directory and press Enter (Carriage Return). To select a file, highlight the file and press Enter (Carriage Return).
If you change directories and then exit the file selection window, Faximum will remember the directory you were in and will start the next file selection from that directory. If you wish to return to your home directory, press F6. If you wish to type in the name of another directory, press F7.
Signature:
This field specifies whether your signature is to be added at the end of the coversheet message. You must, of course, have previously scanned in your signature and entered the path name of the file containing your signature (see "Signature Files" on page 121).
Preview:
The Preview field specifies whether the fax will be displayed on the screen prior to being transmitted. This option is valid only if you are working from the console and are using a graphics display adapter.
Notify:
The Notify field indicates whether electronic mail is to be sent to the user when the fax has been successfully sent. (Electronic mail is always sent when a fax transmission fails.)
Print: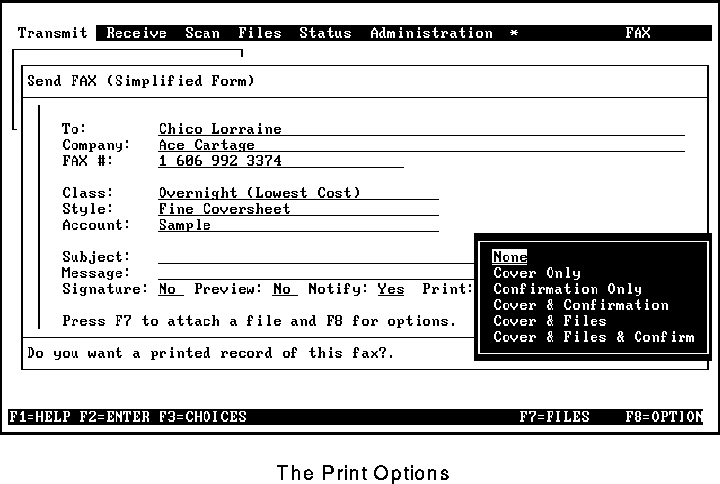
The Print field indicates whether a copy of the fax is to be sent to the default printer as defined in your Preference file (see "Printer" on page 92).
Figure 33 shows the various options that are available for printing parts of a transmitted fax. Selecting Cover will result in a copy of the cover sheet (if one is present) being printing once the fax has been queued. Confirmation will result in a single confirmation page being printed when the fax has been successfully sent, detailing the time and contents of the fax sent (it will include a reduced-size image of the first page of the fax for identification purposes). Files will cause all of the attachments to be printed once the fax has been queued.
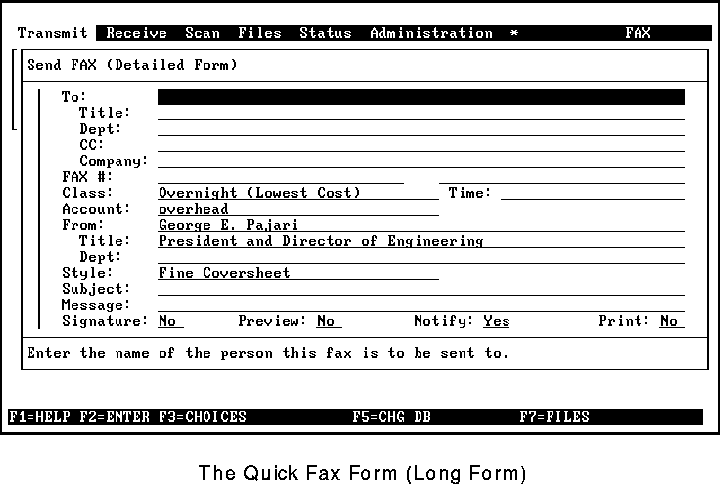
The following fields only appear on the long form (Figure 28):
To Title:
This field contains the title of the person who is to receive the fax. The information in this field will be placed on the cover sheet (if one is to be generated).
To Dept:
This field contains the department or other addressing information (i.e. mail stop or room number) of the person who is to receive the fax. The information in this field will be placed on the cover sheet (if one is to be generated).
CC:
This field contains the list of people at the destination whom you wish to receive copies of the fax. The information in this field will be placed on the cover sheet (if one is to be generated). Note this is an instruction to the receiving party to copy the fax to other people (or an indication that you have sent it to other people)-it is not a command to Faximum to send a copy of this fax automatically to other people.
Alt FAX #:
This field contains the phone number of an alternate fax machine to be used if the primary number fails after repeated attempts.
This number is optional, and may be left blank. If used, the number must be in the same format as the primary phone number (see "FAX #:" on page 46).
From:, Title:, Dept:
The From, Title, and Dept fields are automatically filled in using information stored in the Preference file (See "Preferences" on page 91).
The information from these fields will be placed on the cover sheet (if one is to be generated).
The Attachments Form
The final part of preparing your Quick FAX is to select the files to be sent as part of the fax. This is optional since the entire fax message may be contained in the coversheet message file.
To display the attachments list, press F7 (Figure 34).
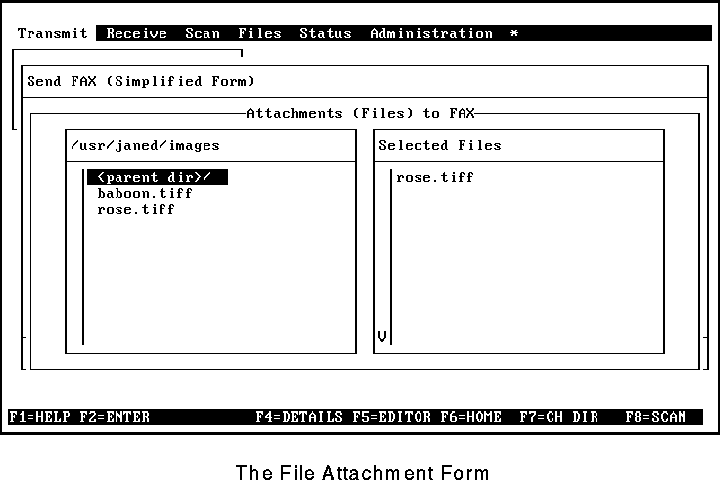
In Figure 34, the left window lists the directories and files that are in the current directory and the right window lists the files that have already been selected as attachments (i.e., files to be sent with the fax). Directories appear before files and have the `/' symbol at the end.
You may move between the two windows by using the left and right cursor keys.
While in the left window you may:
While in the right window you may:
When you are finished, press F2 to confirm your selection of attachments or press ESC to quit from the Send a Quick FAX option.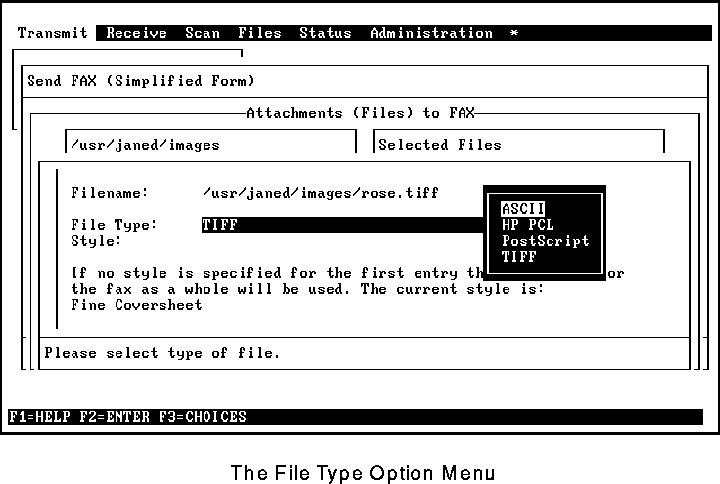
The Type and Style of an Attachment
Each attachment has associated with it a file type and a style. The file type tells Faximum how to convert the file into fax form. For example, a PostScript file has to be run through the PostScript emulator while a TIFF file merely needs to be recompressed into the proper image format for faxing. The other two types of files supported by Faximum are ASCII (i.e. plain text) and HP PCL (i.e. HP LaserJet emulation).
Faximum automatically determines the type of each file when it is added to the attachment list. You would normally only check on the file type if you think the file type might not be obvious, or if you wish to do something non-standard such as sending a PostScript file as plain text.
To check on the type of an attachment (and optionally change it) press the F4 key after highlighting the attachment of interest in the right window. This will cause the file type and style dialog to appear (see Figure 36).
Note that for PostScript files, the PostScript emulator must be installed.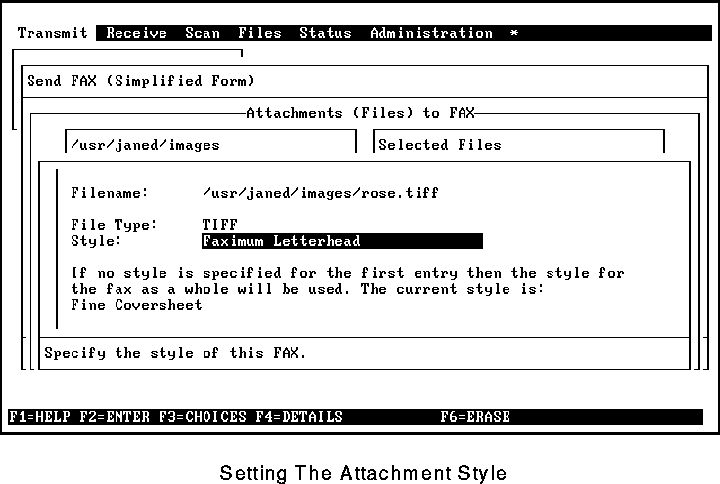
The style of an attachment controls three important aspects of that file's appearance: the page length, the resolution, and the overlay.
If the page length associated with the style is anything other than "As Is" then the attachment will be formatted to appear on a page of the specified length (i.e. Letter, Legal, or A4).
The resolution may be Fine (200x200 dpi), Standard (100x200 dpi), or As Is (the resolution of a TIFF file, or Fine in the case of other file types).
If the style field is blank (the default) then the style for the attachment will be the style for the fax as a whole (see "Style:" on page 46). If the field is not blank then the specified style will be used for this attachment. Note that if the style field is blank and the style for the fax as a whole specifies an overlay, the overlay will only be used on the first attachment.
You can specify the style for any attachment by selecting the attachment (file) in the right window, pressing F4, moving to the Style field, and pressing F3 to display a list of styles (see Figure 37). The selected style as well as the style's overlay will then be used for the attachment.
For more information on overlays see "Overlay Files" on page 124.
Sending the Fax
Once you have completed the fax form and added any desired attachments (files), press F2 to indicate that the fax is to be sent. A short menu will then appear (see Figure 38) containing the following choices:
Automatic (Scheduled) Transmission
This causes the fax transmission to be processed normally. If the Preview option has been requested, there is a brief pause while the fax is prepared and then displayed. If no preview has been requested, then the fax is prepared and scheduled for transmission in the background.
Suspend Send Request (Save Form)
This defers any action on the fax and saves the information that has been entered. The user can enter the Send a Quick Fax function again and find all of the forms as they were. This is especially useful if you want to make an entry in a database and then return to this form.
Note that the information is saved only while you remain within Faximum.
CANCEL Send Request (Erase Form)
This cancels the fax and erases any information that has been entered.
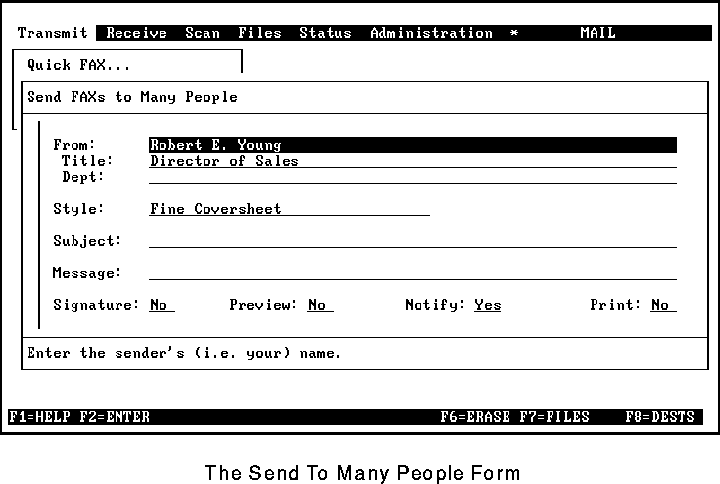
FAX to Many People
This function permits you to send a fax to a list of people. It also permits you to specify the details of a fax that is to be remembered as a saved request. Saved requests can be invoked at any time with a minimum of keystrokes (See "Saved Requests" on page 59.).
The first page of the FAX to Many People function is shown in Figure 39. The fields have exactly the same meaning as the corresponding fields in the Quick FAX form (See "Quick FAX" on page 43.).
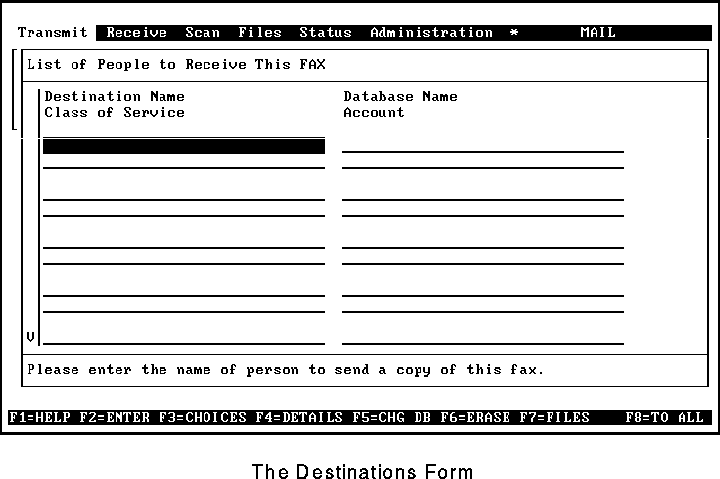
Press F8 to display the list of destinations, which identifies up to fifty people who are to receive this fax (see Figure 40)
.
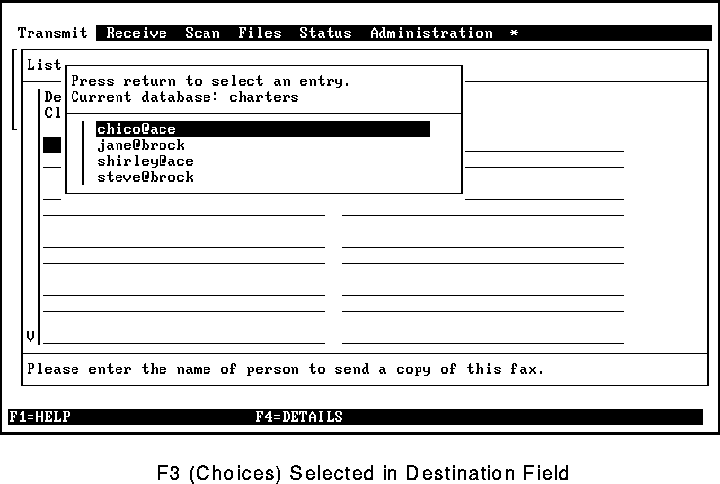
Each destination is specified by four fields spanning two lines of the form. The Destination Name field contains the short name of a person in a people database. Press F3 to bring up the Choices menu and select an entry. (See Figure 41 and Figure 42.)
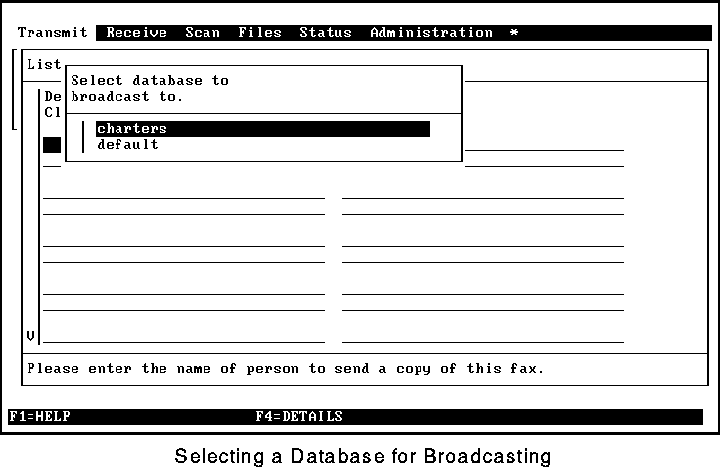
To send the same fax to everyone in a certain database, press F8 and then select the desired database (see Figure 43).
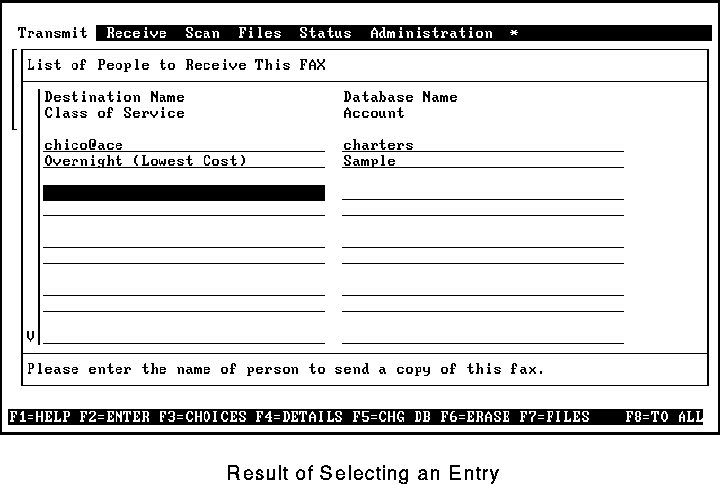
The result is shown in Figure 44.
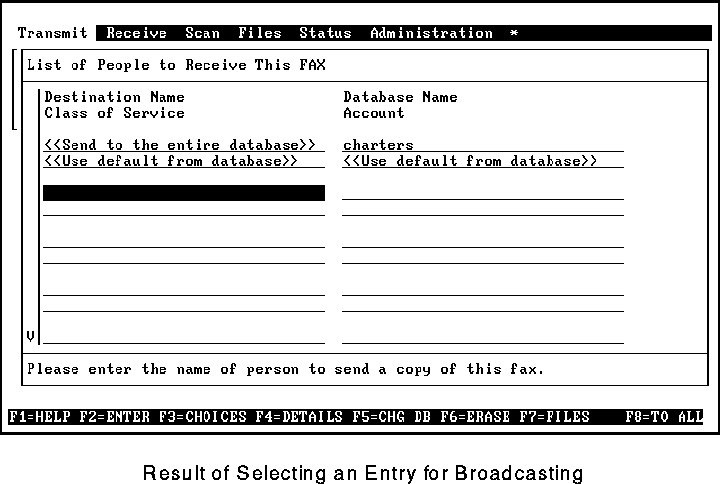
The Database Name field contains the name of the database in which the person is to be found. This field is filled in automatically when an entry is selected from a database for the previous field.
The Class of Service and Account fields have the same meaning as in the Quick FAX form. The default values are taken from the people database but may be overridden.
Pressing F7 at any time will bring up the attachment (files) screen.
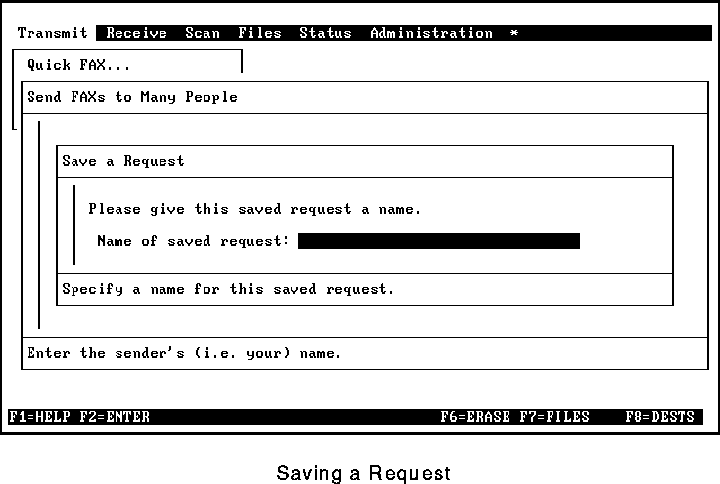
As with the Quick FAX function, pressing F2 marks each page as complete. Pressing F2 from the first page brings up a menu of options (see Figure 38). The only new option is the ability to save the information entered as a saved request for future use.
If you select Save as a Saved Request, you will be asked to provide a name for this saved request (see Figure 45).
Saved Requests
This function allows you to select a previously saved fax transmission (see Figure 46).
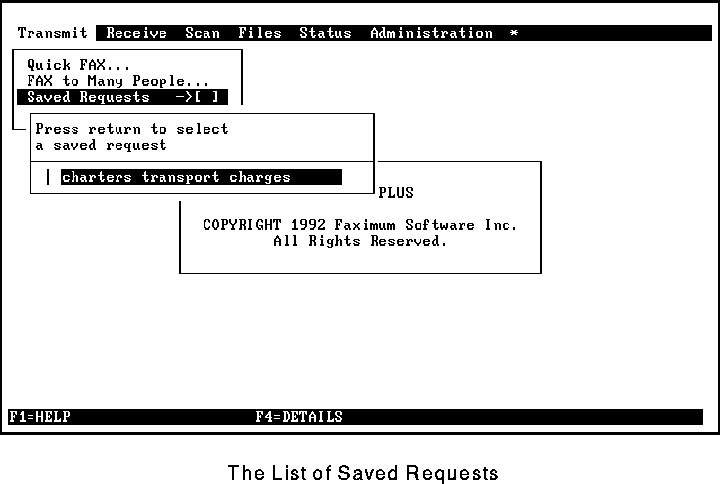
Once a saved request has been selected (by pressing the up and down cursor keys and then pressing Enter/Return) another menu of options appears (see Figure 47).
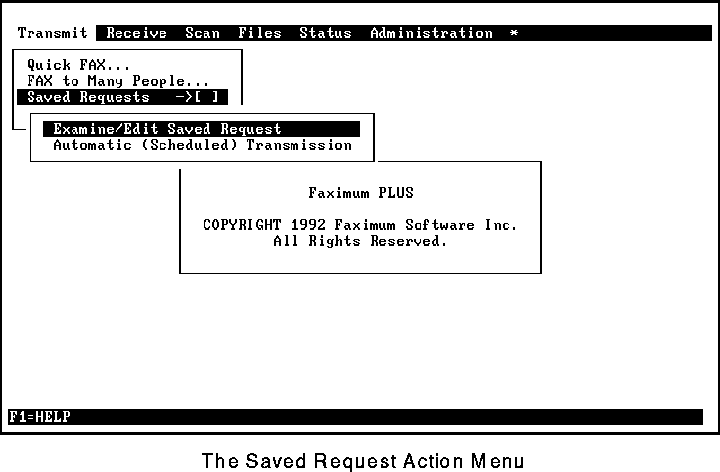
Examine/Edit Saved Request
This permits modification of the saved request. The fields are the same as for the FAX to Many People function, except for two fields that specify the desired printer and scanner (if required).
Automatic (Scheduled) Transmission
This sends the fax. If Preview was requested, then the fax(es) are displayed prior to transmission. (In the case of a fax that is to be sent to many destinations, only the cover sheet for the first destination is previewed.)
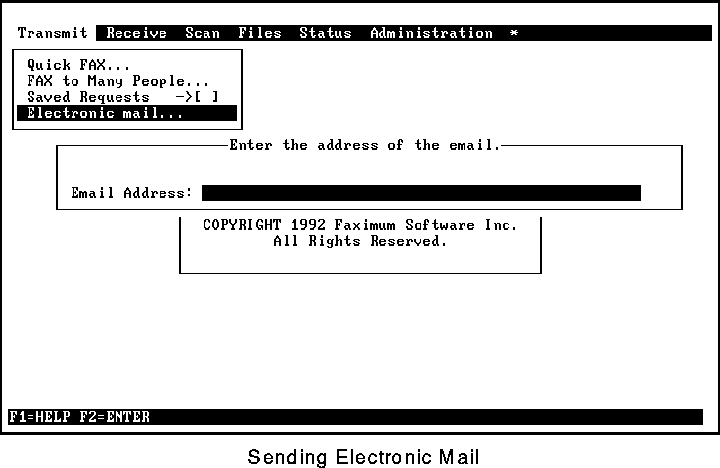
Send Electronic Mail
This function prompts you to specify the recipient of the message (see Figure 48) and then invokes the standard mail program (the program specified by the environment variable MAILPGM or the program mail).
[Top] [Prev] [Next] [Bottom]
support@Faximum.com
Copyright © 1996, Faximum Software Inc. All rights
reserved.