This chapter describes various topics that are best discussed on their own yet do not warrant a separate appendix.
Signature Files
Faximum permits the user to scan in his signature and add to the end of the message on the cover sheet. Even users who do not have a scanner connected to their system can take advantage of this feature by faxing themselves a sheet of paper which contains their signature.
To print out your TIFF file on a PostScript printer, use the tiffps program:
Note that this assumes that (a) your signatures are in the TIFF file named sigs.tif and (b) your default line printer is a PostScript laser printer (use the -d option to the lp command to select another printer). If your printer is an HP LaserJet (or compatible) use the tiffhp program in place of tiffps. Similarly if you are printing on an Epson printer use the tiffepsn program. For the interested, more information on these programs may be found in Appendix A.
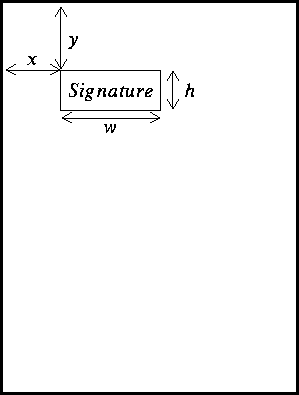
Once you have a printed copy of the image, draw a rectangle around the signature you wish to place on your cover sheet and measure the distance from the edge of the page to the upper-left corner of the rectangle and the size of the rectangle. This is illustrated in the figure below.
To extract this rectangular area, use the tiffcut program specifying the four distances as follows:
For example:
This will create a new file (here called signature.tif) which contains just the signature you selected by itself as a small rectangular image. You can check that you have accurately cut out the signature by running tiffdisplay on the console. For example:
It is this file that you will configure as your signature file as described in the next section
Configuring Faximum
There are two simple steps to configure Faximum to use your signature:
To use this feature you must first create a TIFF file that contains an image of the letterhead or form that you wish to use. Then you must define a style that specifies the name of this TIFF file. Finally, you must specify this style when you go to send your fax. Each of these steps is described in detail below.
Note that overlays only affect files that are attached to a fax (see "The Attachments Form" on page 50). Overlays do not affect the appearance of the cover sheet. If you wish your cover sheet to include a logo or image of your letterhead, please refer to Appendix D.
Creating an Overlay File
This will create a new file (here called letterhead.tif) which contains everything that was in the TIFF file newfax-123 except for the first 0.25 inches. You can check that you have accurately removed the banner by running tiffdisplay on the console. For example:
In some cases you will want the second and subsequent pages of your attachment to be overlayed also. You may have a distinctive second sheet that is used for the second and subsequent pages of your letters, or you may have a multi-page attachment for which every page is to appear as if printed on a business form.
This can be done by creating an overlay file which contains two pages, the first page will be overlayed on the first page of the attachment and the second page on the overlay file will be overlayed on the second and subsequent pages of the attachment. If you have two TIFF files you can combine them into a single, multi-page TIFF file by using the tiffcat command. For example:
Once the overlay file has been created it ought to be placed in the directory /usr/fax/coversheet and given a distinctive name. In the following examples we will assume that the file has been named /usr/fax/coversheet/letterhead.tif
Configuring a Style to Use an Overlay File
To use an overlay file it is first necessary to define a new style that references the overlay file. This is done through the Styles option to the System Administration option to the Administration menu.
The details of the various fields in the style database are discussed in "The Style Database" on page 37 while the steps to add a new entry to a database are covered in "Adding a New Entry" on page 94.
Before adding the new style it would probably be useful to examine some of the existing entries to gain an idea of how the various fields ought to be set.
When the style selected for the fax has an overlay file associated with it, then that overlay will be used on the first attachment. The second and subsequent attachments will not be affected.
WordPerfect Integration
A particularly convenient feature with Faximum is the ability to fax documents created using WordPerfect directly from within WordPerfect. Before trying to use the WordPerfect fax macro it is necessary for your WordPerfect system administrator to configure a new printer and port for WordPerfect. This is described in detail in "WordPerfect Integration" in the Installation Guide and Release Notes for Faximum.
Note that selecting the delete options will not affect your original WP file.
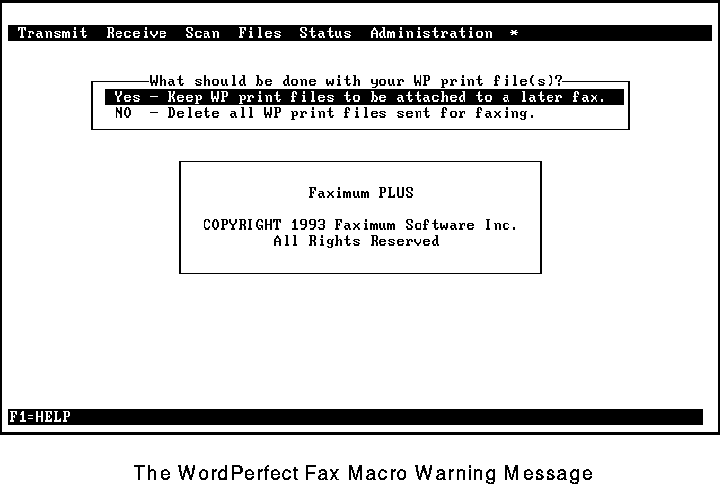
If you do wish to send more than one WordPerfect document in a single fax, then merely escape from Faximum once you have run the fax macro on the first document (selecting the "Keep..." option when presented with the dialogue illustrated in Figure 107) and then run the fax macro on the second document. When you run the fax macro the second (or subsequent time), Faximum will verify that you do indeed wish to fax more than one document (see
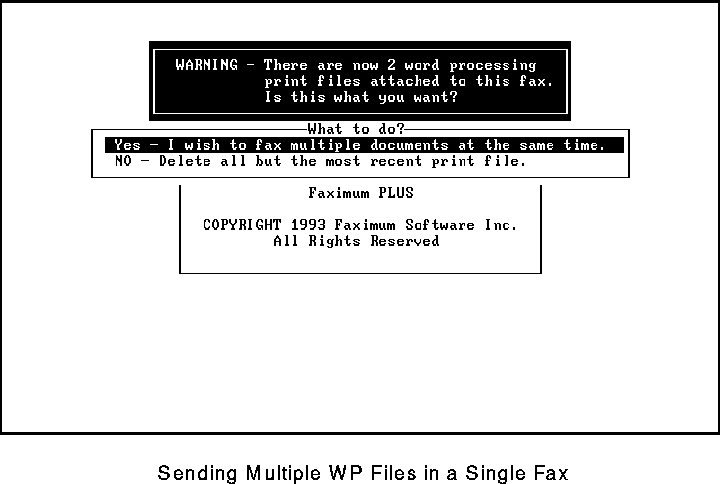
When multiple WP files are to be faxed, they will be attached in the order the fax macro was run.