®
®
Faximum ELS/PLUS Reference Manual
for SCO OpenServer 5 - Release 2.1 - HTML Edition - Draft 1
[Top] [Prev] [Next] [Bottom]
Cover Sheets
Introduction
This document describes how to change existing cover sheets and how to design new fax cover sheets. Before proceeding, the reader might find it useful to acquaint himself with the details of the asciitiff program (described in Appendix A) and the contents of the style database (see chapter 2 of the Reference Manual).
In this document, the notation ~fax refers to the master directory for Faximum (normally /usr/fax).
Changing an Existing Cover Sheet
This section shows how to make minor changes to your existing cover sheets such as changing your company information or adding a company logo.
Minor Changes
In order to make minor changes to your cover sheets (such as changing your company name or address) all that is necessary is to locate the name of the coversheet description file and then edit it using a text editor such as vi.
To determine the name of the coversheet description file, display the entry in the style database that uses the cover sheet and look at the Coversheet field. This can be done through the user interface by accessing the Styles option to the System Databases menu under the Administration menu (see "The Style Database" on page 37 as well as "System Databases" on page 100).
The fixed information (such as your company name, address, and phone numbers) are easy to locate near the beginning of the file. The rest of the file contains commands to arrange the information on the page, select fonts, and place variable information (such as the name and company of the person to whom the fax is to be sent). These commands start with the sequence $[ and end with a ]. They ought not to be changed unless you are familiar with the asciitiff program.
Once you have made the changes to your coversheet description file, send yourself a fax to make sure that the changes are correct.
Adding a Logo
Adding a company logo to your cover sheet is relatively easy and is done in two stages. In the first stage you create a TIFF file which contains the image of your logo. In the second stage you edit your coversheet description file to include the image of your logo on the cover sheet.
Creating an Image of Your Logo
There are several different ways in which you can create an image of your logo:
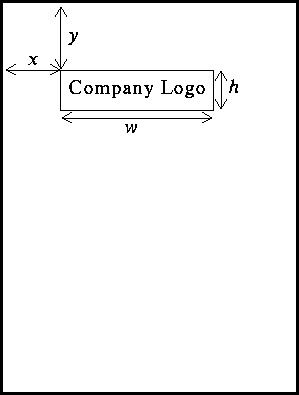
To extract this rectangular area, use the tiffcut program specifying the four distances as follows:
/usr/fax/bin/tiffcut -x x -y y -h h -w w logo.tif final.tif
For example:
/usr/fax/bin/tiffcut -x 1i -y 1.4i -h 0.5i -w 3i logo.tif final.tif
This will create a new file (here called final.tif) which contains just the logo itself as a small rectangular image. You can check that you have accurately cut out the logo by running tiffdisplay on the console. For example:
/usr/fax/bin/tiffdisplay final.tif
It is this file that you will include on your cover sheet by editing the coversheet description file as described in the next section.
Including a Logo/Letterhead on the Cover Sheet
To place the logo or letterhead on your cover sheet, edit the coversheet description file (see "Minor Changes" above) to add a line similar to the following as the first line of the file:
$[tiffinclude /usr/fax/coversheet/final.tif 0i 0.5i $ $]
This assumes that you have placed the small rectangular image that contains your logo in a file called /usr/fax/coversheet/final.tif. The two numbers (0i 0.5i) specify the position of the upper-left corner of the logo (in this case 0 inches from the left margin and 0.5 inches from the top of the cover sheet page).
If you wished to overlay your entire letterhead onto your cover sheet, you could do so in exactly the same manner, just change the two numbers to 0i 0i to specify that the upper-left corner of the TIFF image is to be aligned with the upper-left corner of the cover sheet. For example:
$[tiffinclude /usr/fax/coversheet/letterhead.tif 0 0 $ $]
Once you have added your logo or letterhead you may wish to remove the company name (and possibly the address and phone number) which normally appears on the cover sheet. This information usually appears near the top of the cover sheet description file.
Once you have added your logo, send yourself a fax to verify the correct placement and appearance of your logo.
Defining a New Cover Sheet
A coversheet description file is nothing more than a normal ASCII file that includes commands to asciitiff to place text and lines on the page.
The easiest way to understand the process is to examine an existing cover sheet. The following is the sample cover sheet which is distributed with the system (in the file ~fax/coversheet/pse-standard).
A $[tiffinclude /usr/fax/coversheet/pse.tif 0 0 $ $]$[moveto 0 0]
B $[font cmssb.48]$[set line-width 3]$[moveto 0.8i 2i]Fax Transmission
$[moveto 0.8i 2.6i]$[set-mark . .]$[font cmb.16]
C $[moveto @ .]To:$[moveto @ .]$[font cmr.16] $[replace name]
$[moveto @ .]$[replace title]
$[moveto @ .]$[replace dept]
$[moveto @ .]$[replace company]
$[moveto @ .]$[replace fax1]
D $[font cmb.16]$[moveto @ .]Cc:$[moveto @ .]$[font cmr.16]$[replace cc]
E $[font cmb.16]$[moveto @ .]From:$[moveto @ .]$[font cmr.16]$[replace from]
$[moveto @ .]$[replace from_title]
$[moveto @ .]$[replace from_dept]
F $[font cmb.16]$[moveto @ .]Subject:$[moveto @ .]$[font cmr.16]$[replace subject]
G&H $[box @ @ @+7i .+0.1i 0.25i] $[set indent 0.8i] $[font cmss.12]
In this listing the tab character appears as .
This coversheet description file will produce a cover sheet that looks something like that on the next page. The letters in the left margin mark sections of the coversheet description file that describe each of the major parts of the cover sheet. These parts are also labelled on the figure below.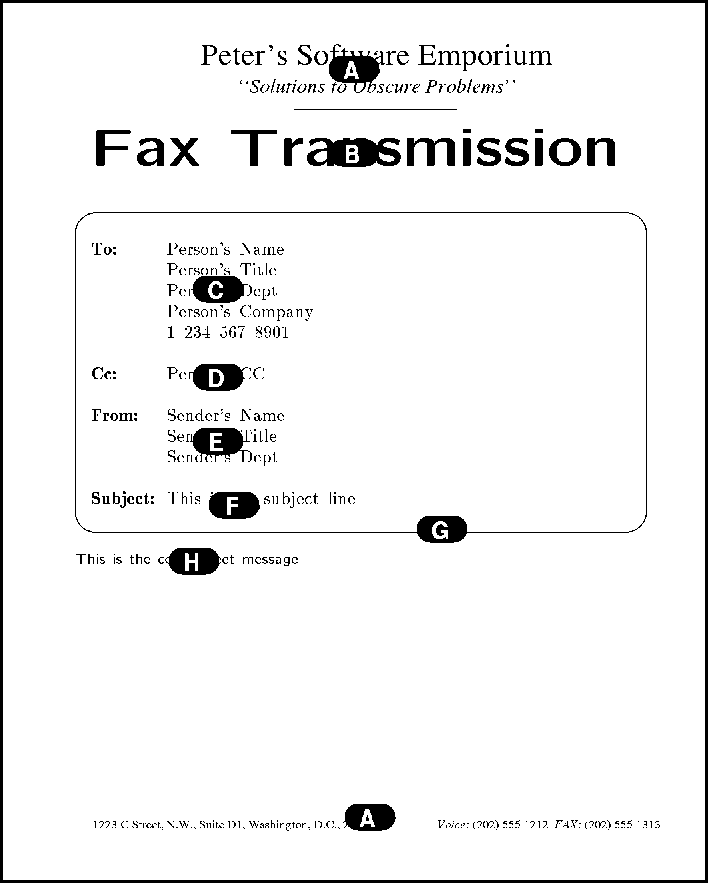
We shall look at this coversheet definition file line by line to see how it is constructed to learn how one can modify this example to suit one's own needs. Before proceeding, the reader will definitely find it useful to acquaint himself with: the details of the asciitiff program (described in Appendix A); and the contents of the style database (see chapter 2 of the Reference Manual).
The Letterhead/Logo Overlay (Part A)
A $[tiffinclude /usr/fax/coversheet/pse.tif 0 0 $ $]$[moveto 0 0]
The first thing we do in this coversheet description file is include the TIFF file which contains an image of the company's letterhead. The tiffinclude command instructs asciitiff to include the named TIFF file and position its upper-left corner flush with the upper-left corner of the cover sheet.
In this case we are including an entire page of letterhead which not only provides the company name at the top of the cover sheet ("Peter's Software Emporium") but also the address at the bottom of the page ("1223 C Street...").
The moveto command at the end of the line moves our current position back to the top of the back. If this were to be omitted, the next line in the coversheet description file would start at the top of the next page
The "Fax Transmission" Title (Part B)
B $[font cmssb.48]$[set line-width 3]$[moveto 0.8i 2i]Fax Transmission
$[moveto 0.8i 2.6i]$[set-mark . .]$[font cmb.16]
The font command selects a large bold font which we will use to print the title "Fax Transmission" across the top of the cover sheet (right underneath the letterhead. See Appendix B for a list of the available coversheet fonts.
The set command is used to adjust various asciitiff parameters. In this case we set the width of the line we will be drawing later to three pixels.
The moveto command positions the title and then we type the title ("Fax Transmission") itself. Refer to the illustration of the cover sheet to see how this appears (the title is labelled with the letter B).
We now prepare to print the routing information.
The moveto command moves our current position to where we want the upper-left corner of the box that surrounds the routing information (marked with a G on the illustration).
The set-mark command remembers this location so that we know where the corner is to be placed when we go to draw the box itself later.
The font command then selects another smaller font which we will use to label the routing information (i.e. for the words "To:" "Cc:" "From:" and "Subject:").
The "To" Information (Part C)
C $[moveto @ .]To:$[moveto @ .]$[font cmr.16]$[replace name]
$[moveto @ .]$[replace title]
$[moveto @ .]$[replace dept]
$[moveto @ .]$[replace company]
$[moveto @ .]$[replace fax1]
We now write out the information about the person to whom the fax is addressed.
The first moveto command specifies @ as the horizontal position (which means the same distance from the margin as we were when we issued the set-mark command earlier) and specifies . as the vertical position (which means the current position or in other words, no change).
This command (which is repeated many more times below) is used to set us a fixed distance from the left margin.
We then write out the "To:" label.
Next, we move back to the same position we started and then we tab over to where we will write the person's name.
We tell Faximum that this is where we want the person's name by using the replace command and by giving the name of the variable which contains the person's name (i.e. "name"). There are a number of variables which contain the variable information to be placed on the cover sheet:
The variables and their contents are as follows:
name the name of the person to whom this fax is being sent;
title the title of the person to whom this fax is being sent;
dept the department or mail stop for this person;
company the company to which this fax is being sent;
fax1 the primary fax number for this company;
cc the cc list for this fax;
from the name of the person sending this fax;
from_title the title of the person sending this fax;
from_dept the department or mail stop for the person sending this fax; and
subject the subject of this fax.
The remaining lines in this section use the replace command to write out the remaining information related to the addressee.
The "CC" Information (Part D)
D $[font cmb.16]$[moveto @ .]Cc:$[moveto @ .]$[font cmr.16]$[replace cc]
We now write out the list of names (if any) that are to receive copies of this fax (i.e. the CC list).
We first use the font command to select a bold font, then we move to a known position from the left margin, we write out the label "CC:", we change the font to one that is not bold, and finally we tab over and use the replace command to write out the CC list itself.
The "From" Information (Part E)
E $[font cmb.16]$[moveto @ .]From:$[moveto @ .]$[font cmr.16]$[replace from]
$[moveto @ .]$[replace from_title]
$[moveto @ .]$[replace from_dept]
This section writes out the information about the sender of the fax and is similar to the previous sections.
The "Subject" Information (Part F)
F $[font cmb.16]$[moveto @ .]Subject:$[moveto @ .]$[font cmr.16]$[replace subject]
This section writes out the information about the subject of the fax and is similar to the previous sections.
The Box and Coversheet Message (Parts G & H)
G&H $[box @ @ @+7i .+0.1i 0.25i] $[set indent 0.8i] $[font cmss.12]
The last thing we do is draw a box around the routing information we have just written and prepare for the message (which will be added to the cover sheet automatically).
The box command takes five parameters: two specify the location of the upper-left corner; two specify the lower-right corner; and one specifies the radius of the curves on the corners. In this example the upper-left corner is placed at the point marked using the set-mark command earlier; the lower-right corner is placed seven inches to the right of the left edge of the box and a tenth of an inch below the current position; and the corners have a quarter-inch radius curve.
That done, we use the set command to adjust the left margin that will be used for the message on the cover sheet. Finally, we set the font that we wish the message to appear in.
[Top] [Prev] [Next] [Bottom]
support@Faximum.com
Copyright © 1996, Faximum Software Inc. All rights
reserved.